Photo: Jill Odom/Total Landscape Care
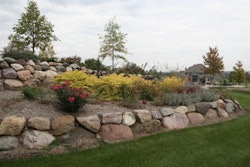
One of the most popular plants in landscaping is the rose, and it’s easy to see why, as they come in a variety of colors and fragrances and they thrive well in most environments.
If your customers are showing an interest in roses for their landscape, take a look at the preparation you’ll need to administer to the site before planting and what to keep an eye out for once they are established.
Site selection and planting prep
Location
As with every plant in a landscape, location plays a key part in the success of the rose, so take time to inspect the soil of the intended area before planting begins.
The Mississippi State University (MSU)Extension recommends placing roses in areas that will receive ample amounts of sun, along with light shade during the early afternoon.
“Roses cannot stand deep and continuous shade,” the MSU Extension says online. “Shelter from cold wind is helpful. A nearby hedge or fence is useful, but it should not be close enough to shade the bushes. Avoid planting in the lowest part of the garden if it is a ‘frost pocket.’ Roses do not thrive in exposed, low-lying sites.”
 Photo: Jill Odom/Total Landscape Care
Soil and fertilizing
Roses typically thrive in medium loam soil that has free internal drainage, is slightly acidic and is rich in organic matter and fertilizer nutrients.
Sandier soils will not hold onto nutrients or water as well as clay or loamy soils will, but keep in mind that clay soils may require much more effort when it comes to balancing pH or providing drainage.
The MSU Extension says soil for roses should be prepared in the fall, whether you’ll be planting in fall or spring, as this will allow time for the soil to settle.
The MSU Extension says that the ideal soil pH is 6-6.5, as nutrients will become less available as the pH becomes more acidic (5.0 or less). In the fall, winter or early spring, lime can also be added to the soil to increase the pH, and remember that fertilizers that contain sulphur will usually lower the soil’s pH.
Planting
Before planting the roses, be sure to inspect the canes carefully to make sure they were pruned properly. The MSU Extension notes that canes should be cut at an angle approximately one-fourth inch above a node, and to prevent flowering delay, do not cut the canes shorter than 10 inches.
“If you’re planting a few roses, dig individual planting holes,” the MSU Extension says online. “Make holes at least twice the size of the root mass and 12 inches deep. For a large number of roses in a continuous bed, prepare bed by spading soil to a depth of about 12 inches. Dig planting holes in the prepared bed.”
The MSU Extension recommends creating a small mound of prepared soil in the planting hole, and follow this by spreading the roots over the mound and setting the plant to its proper depth.
After this, the MSU Extension says to backfill the planting hole with prepared soil, firm it and water the soil thoroughly immediately after it’s planted.
Always avoid planting them too high or too deep.
Black spot
Once your customer’s roses are established, it’s important to keep an eye out for black spot infection, which is one of the most common diseases roses are faced with.
This disease can lead to severe defoliation and can weaken the plant to the point that it is easily susceptible to other diseases, winter injury and insect attacks.
 Photo: Scot Nelson/Flickr
Black spot is caused by the fungus Diplocarpon rosae, which commonly appears on hybrid teas, grandifloras and varieties of miniature roses. The disease can overwinter in infected canes and leaves from the season previous, and the spores will spread to a new plant’s lower leaves by water from rain or irrigation.
The fungus is able to tolerate a wide variety of temperatures, which means symptoms can develop throughout the season if the moisture is high, and leaves will typically need to be wet between six and nine hours for the fungus to develop.
When looking for symptoms, check around the upper leaf surface for black spots that are up to ½ inch in diameter, and they can sometimes have yellow halos around them. The infected leaves will eventually turn yellow and fall early, and infected canes will show raised, red-purple splotches that could later become blackened and blistered.
If you or your customer find signs of black spot, immediately take action to try and save the plant. Begin by removing any infected leaves and stems and don’t forget to rake up any fallen leaves that are under the plant. These leaves will need to be discarded or burned, and if your customers have an active compost pile, be sure they do not put these infected leaves there.
Once these infected pieces have been removed, apply a fungicide treatment of chlorothalonil, mancozeb, myclobutanil, propiconazole, copper or sulfur-containing products. Over the course of the season, these sprays will need to be applied every seven to 14 days to help prevent future infections. If there is a dry spell in the area you service, applications will need to be less frequent.