Retaining walls can be a great addition to the services you offer and they solve a variety of landscape problems.
“Anywhere you might use a poured-in-place (concrete) gravity wall, natural stone or railroad ties,” says Charles Gamarekian, chairman/CEO of Cambridge Pavingstones. “Mortarless, segmental retaining walls will provide a more durable, cost-effective and maintenance-free wall system.”
However, in most municipalities, building a wall taller than 4 feet requires a permit and an engineered plan. “This is to ensure that the walls are constructed properly and built with local building codes, which in turn requires experienced builders to follow the plan,” says Al Pfannenstein, a Belgard Hardscapes retaining wall product specialist.
When you begin to offer retaining walls, keep them low and build them with a pre-engineered wall product such as interlocking blocks.
On larger walls, engineers include a leveling pad as part of the plan. Likewise, on a small interlocking block wall project, “you must give careful attention to the block manufacturer’s recommendations for the compacted base upon which you build,” Pfannenstein says.
Water behind the wall contributes significantly to the hydrostatic pressures on the wall.
“In the old days, the objective was to seal out surface water with a concrete or clay cap,” says John Russell, a landscape architect in Birmingham, Alabama.
Such attempts were largely unsuccessful. “A more modern approach is to pull water through the system to get rid of it as quickly as possible, instead of trying to block it,” Russell says.
Although manufacturers address design issues with various interlocking block systems, the basics of installation are the same.
Lay out the wall
Use a string line for straight walls or a garden hose for curved walls, and mark out a layout line on the ground with marking paint.
Dig for a leveling pad
Starting at the end of the wall that is lowest in elevation, dig a trench with a bottom that is 1 foot below grade. Make sure the trench is nearly level in both directions.
TIP
If you find keeping your trench level is getting more than two-blocks deep, you can make steps in the trench that are equal to the height of the blocks you will be using.
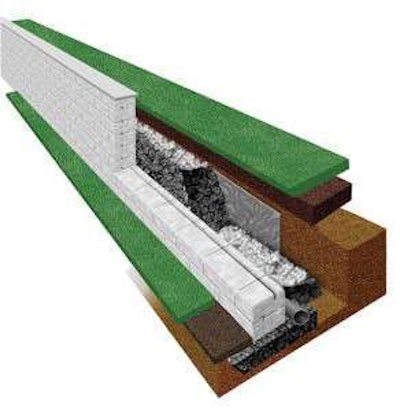
Wall caps
Wall caps of solid, flat material are a key design component to an interlocking block wall system. Most blocks are designed with a trapezoidal shape so they can be used in curved or straight walls. This leaves a gap between adjacent blocks along the back edge, which the cap covers. Wall caps also cover the locking systems in most designs.
Interlocking blocks
Interlocking blocks come in a variety of sizes and colors. Manufacturers vary on how they lock each successive course of blocks to the row beneath. Some use metal or ceramic pins, while others employ a built-in tongue and groove system where a groove in the bottom aligns with a ridge in the top. Another common locking system is a lip formed along the lower back edge of each block that overlaps the lower block and creates a setback for each successive row.
Gravel backfill
A barrier behind the wall, lined in fabric and filled with gravel, creates an area for water collection and movement.
Landscaping fabric
The fabric helps keep the voids in the gravel from packing with silt.
Top soil
Leave room above the gravel backfill for topsoil or bedding soil. You can use the top courses of block and the wall cap as edging.
Existing site soil
Try to precisely extract soil for the area needed for the gravel backfill. Leaving as much of the site soil as possible undisturbed is generally preferable to having to return soil as backfill.
Drainage pipe
Perforated pipe, which allows water to enter along the length of the wall, is an important component for handling water and reducing pressure on the wall structure.
Compacted gravel base
A trench with 3 to 6 inches of compacted gravel creates a solid base for the first row of blocks. Make the trench deep enough below the bottom grade to allow for the compacted gravel and the first course of block. Locking in this first course is critical to prevent the wall from sliding.
Add and compact a gravel base
Add 3 to 6 inches of gravel. Three-quarter, clean-grade crushed rock makes a good gravel for compacting. Compact the gravel base with a tamper-plate compactor or jumping-jack style compactor.
Set the first row of blocks
Lay the first course. Level each block end-to-end and side-to-side. Use a 4-foot level to straighten several blocks at once.
Lay the drainpipe
Connect enough perforated pipe to reach the length of the wall. Wrap the pipe in landscaping fabric and position it just behind the first course of block. Slightly raise the end away from the desired pipe exit for positive water flow.
Add additional courses
Add the next course of block breaking up the vertical lines by centering the first block of a new course over a joint line of the course beneath. Make sure the block is solidly on the one below with no interfering debris and the locking mechanism (pin, groove or lip) is properly aligned.
Backfill
With the second course in place, backfill the first course with gravel. This backfill gravel should not have any fines or sand mixed in. Three-quarter, clean crushed rock is ideal because water must pass through it. Continue adding rows and backfilling until your wall has reached its desired height.
Top it off
Wrap landscaping fabric over the gravel backfill and trim the fabric. Add irrigation pipe, topsoil, sod or plants as desired.