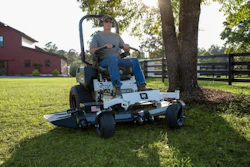
Photo courtesy of Waynes
Spreaders and sprayers are the workhorses of lawn care, but even they occasionally need some TLC.
“They’re like any other piece of equipment you own,” says Brian Ethridge, business leader for lawn care services with Waynes in Birmingham, Alabama. “You should perform regular maintenance tasks to prevent downtime.”
Most maintenance can be done in-house in an hour or two per unit.
“Put it on the schedule. If you don’t, suddenly it’s time to use the equipment and you’re not ready,” says Chris Lemcke, national technical director at Weed Man. “We use an Excel spreadsheet with links to the equipment that tells me when my start and finish dates are for each maintenance task.”
Follow these general tips to help your spreaders and sprayers last for years.
Spreaders
Inspect from top to bottom. At the start of the season and then on a regular basis, give the unit a once-over. Repair broken welds in the frame. Make sure gears are tight with no play in them. Check the tire pressure. Service all grease points.
Examine the shutoff assembly, the metal plate located against the hopper, which can wear over time and allow product to leak out. Also, check the operation of the slide plate on this assembly, which modifies the amount of product when the deflector is being used to trim edges. “Closing the third hole prevents an excessive amount of fertilizer from being applied when it’s in use,” says Ethridge.
For spreaders equipped with engines, perform the usual tasks, according to the manufacturer’s recommendations, such as changing the oil and air filters, inspecting spark plugs and checking the battery.
Take a parts inventory. Components often get lost, especially when you’re moving a spreader on and off the truck 25 to 30 times a day. Check for cotter pins and roll pins. “Keep a few spares on the truck so you won’t have to stop working and head back to the shop,” says Marcus Belote, owner of Turf Experts, LLC, in Raleigh, North Carolina.
Look for holes in the hopper cover, which prevents materials from dumping out if a spreader overturns. Drill a hole in the corner of the spreader and zip tie the cover in place so it can’t blow off when in the back of the truck, suggests Lemcke.
Make sure each spreader has a screen in the bottom of the hopper to filter clumped particles, says Ethridge.
Keep the plastic calibration gauge attached to the handle so you can double-check your spreader settings. Another good tool is a calibration box, which allows you to load, test, capture and weigh the output of your spreader. “It’s expensive but it’s a one-time purchase that saves you money on product if calibration is correct,” says Ethridge.
Hose it off. Clean spreaders on a daily or weekly basis, depending on frequency of use and the type of material you’re spreading. “Some products, such as fertilizer, build up inside the hopper and on the impeller so that you won’t get an even distribution of material,” says Belote.
Ensure you’re rinsing units over a contained area or catch basin so residual materials aren’t going down the drain. “Always dispose of product properly, according to the manufacturer’s labeled instructions,” advises Lemcke. Units should air-dry overnight.
Sprayers
Do the usual chores. Perform standard machine maintenance regularly: Change the oil and air filter. Service the spark plug. Check the tires. Lube the grease fittings. “Basic maintenance prolongs the lifespan of your equipment,” says Anna Foster, marketing manager for The Toro Company. “Maintenance also helps with calibration because you won’t use too little or too much material when your equipment is functioning properly.”
Check for leaks. Examine the spray nozzle. It can be damaged if it’s dropped or dragged across concrete. Look for leaks at couplings and the hose-to-reel connection. Unroll the hose to check for nicks where it caught a curb or downspout. Some companies replace hoses every few years. Sometimes hoses can be flipped on the reels after a year or two because the first 100 feet is what’s used the most, so there’s a large portion that’s unworn, says Lemcke.
Inspect the diaphragm. Some companies replace the diaphragm every couple of years, but other businesses are more proactive. “I replace the diaphragms every year,” says Belote. “I don’t need a failure during the season. It’s well worth doing now instead of having to wait five days for a part to arrive in the middle of July.”
Clean it regularly. Don’t let product remain in the tank overnight. Fill the sprayer tank with clean water and run through; check the manufacturer’s recommendations for how much water you should use to flush the system. Follow local codes and the chemical manufacturer’s instructions for disposing of waste sprayer chemicals.
Also, a garden hose is usually sufficient for cleaning. “Avoid using a power washer to clean these machines,” says Foster. “It can force residual corrosive materials into the components.”
Additionally, take apart and clean sprayer nozzles every week to prevent clogging. Pull the strainer in the spray tank daily to look for particulates or items that may have dropped in the tank, such as a plastic lid from a chemical container. “It’s the first place I tell my technicians to check if there’s a loss of pressure,” says Ethridge.