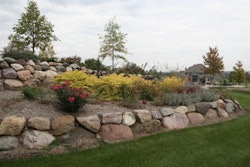
The C. Baldwin Hotel in Houston features a living wall that has an estuary-look to it.
Photo: Shannon O’Hare
The desire for green spaces in urban areas is ever increasing, with them appearing in hospitals, restaurants and other business settings.
“The general population is really aware of the benefits of plants,” says Nathan Beckner, lead plant designer at Sagegreenlife, based in Chicago, Illinois. “It’s not just a trend. They all have that expectation of wanting living plant material in their spaces.”
However, there’s much more that goes into these green walls than meets the eye. Beckner shares his design process when it comes to creating a living wall.
The first step is determining whether the project will be an interior or exterior wall. Beckner explains that this will affect the plant palette used, as well as the nature of the design. He says as soon as the client reaches out, he begins thinking about what direction he’d like to go.
Beckner says that most clients have an awareness of living walls and have a concept of what they want their wall to look like.
“I will work with them to come up with something that meets their aesthetic,” he says. “Since every client is an individual, they always have a custom touch. Every wall that we do is a completely one of a kind piece.”
During the design process, Beckner also makes an effort to incorporate local environments and topography. For example, one project in Houston Sagegreenlife did, Beckner utilized the native carix to create an estuary look reminiscent of Houston’s geography.
“I usually try to pull from nature wherever the wall is going even if it’s an interior wall,” he says.
While some clients may have certain plants in mind that they’d like included in the living wall, Beckner says not all of them are a good fit for vertical growing settings.
“Sometimes, it works perfectly and other times I’ll explain why it won’t work and suggest a substitution that works very well that can give them that same look in the design,” he says. “It’s navigating with the clients and helping explain the best plants and still get the design and look they’re going for.”
As for some of his personal favorites for indoor walls, Beckner says he likes to use Philodendron cordatum as a base, as it is durable and plays well with other plants. He also likes the Austral Gem fern, as it is sterile and doesn’t lose fronds like Boston ferns.
“Those are two great workhorses for interiors,” he says.
With exteriors, Beckner says you can’t go wrong with evergreens, as they provide four seasons of interest. He likes to use arborvitae for exterior designs, as there are a number of dwarf cultivars that come in golds and blue and do well across the U.S.
The amount of time it takes for him to create a rendering of a living wall project depends on the size and complexity of the wall. Beckner says a small, simple green wall can be rendered in a day, while more intricate designs where customers want to see different options and variations can take a couple of weeks to get a rendering completed after going back and forth with the client.
The two main limitations Beckner says he has to deal with when designing living walls are the location of the wall and the availability of plants.
The first challenge simply comes down to managing clients’ expectations and explaining why a living wall can only go in certain spaces.
“It’s not a piece of metalwork where you can just put it up and forget about it,” he says. “They do have to be accessible. We have to explain and usually, they can redesign or incorporate the wall in some way that’s much more accessible.”
Plant availability can be an issue sometimes in the green industry and living walls are no different. Beckner says they make a point to explain to clients the time needed to order and grow a plant when they are expecting it the next day.
“Usually with our lead times we always take that into account, so that usually isn’t an issue, but something we have to be aware of is the timelines and lead times,” he says.
Once Beckner has completed his design and gathered his plant list and plant count, he says they send it to their growers.
“We have growers all over the country,” Beckner says. “We try to grow every project as local as possible. We will order the plant material. They come in smaller plugs or liners, and then those go to our grower and they plant them into our tile system and they grow in our Biotiles, anywhere from eight to 10 weeks.”
The Biotiles are Sagegreenlife’s patented system for growing the plants. They are made of rockwool (layered basalt rock fiber), providing a rooting and growing environment that evenly distributes water, oxygen and nutrients in the hydroponic wall system.
When it comes to the installation of the actual living wall, Beckner says this depends on the scope of the project as well as where they fall in the actual construction process.
Sagegreenlife’s system goes up relatively quickly after the backer board, drainage mat and battens have been installed. Beckner says this part of the process can take a day or two but larger projects can last three to four days. The Biotiles can typically be placed in a day, as they only have to be screwed in since the plants are pre-grown into the tiles.