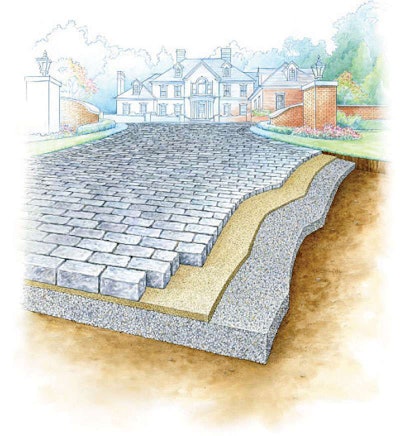
Anatomy of a Paver Driveway
Success lies in attention to the details
Comprehensive landscape jobs are often accompanied by driveway work. Is the concrete contractor getting that work instead of you? Having an attractive hardscape option can help you add to your bottom line.
Paver-driveway installs have become a significant contributor to the business of many landscapers. You should emphasize the choices in pattern and color, the benefits of job scheduling when combining driveway with landscape and the cost-effectiveness, often comparable to stamped and stained concrete driveways.
In general, a paver driveway is a larger version of the sidewalk and patio jobs you may have done. However, specifications for the depth and compaction of the sub-base, determined in large part by local soil types and available sub-base material, must be thicker and stronger to handle the stresses of vehicle traffic.
Specifications for the depth and compaction of the sub-base is determined in large part by local soil types and available sub-base material.
Plan and Layout:
1. Choose paver type, color and pattern with designer and client
2. Layout perimeters of driveway
3. Plan material removal and delivery schedule
Excavate:
4. Dig out the driveway to 10 inches below finish grade (or paver + bedding sand + sub-base)
5. Provide a minimum of 2 percent fall, i.e. slope at a rate of 2 inches per 8 feet
6. Remove additional organic material and loose dirt
Install Sub-base:
7. Provide a sub-base of crushed concrete, 3/4″ minus crushed rock or 21-AA depending on your location.
8. Carefully fine-grade and thoroughly compact the sub-base layer to a consistent depth below finish grade.
Install Bedding Sand:
9. Distribute course bedding sand, such as 2NS, evenly over sub-base
10. Use screed rails and screed boards to fine-grade the bedding sand
Lay Pavers:
11. Place the pavers according to the design, making sure everyone on the crew understands the pattern.
12. Avoid sliding pavers into place, which can disrupt the bedding sand and make inconsistent joints. Use the click-and-drop technique.
13. Cut pavers to fill in spaces with half bricks and wedges as needed
Install Joint Sand:
14. Sweep sand into the joint.
15. Compact to fill and lock joints
16. Sweep off excess
17. Wash for traditional sand or carefully follow finishing steps for polymeric
Base notes
When beginning a driveway, Ryan Youngblood of R. Youngblood & Company in Rochester, Michigan, uses a laser level to shoot grade relative to a benchmark. “In certain areas, you will use industry specs for water pitch, and other areas will exceed specs to hit the benchmarks like masonry walls and curbs,” Youngblood says.
The goal is to meet or exceed the minimum fall for water run-off (2 to 4 percent), while using the natural contours of the property in areas that exceed the minimum.
“We use 21-AA crushed limestone gravel as a sub-base,” Youngblood says. “Gravel sizes range from 1 1/2 inches all the way down to fines.”
R. Youndblood & Company partnered with Brickside Brick Paving on the project shown. The driveway leads to a dramatic circle adjacent the home’s front entrance that required careful layout with stringing poles. Natural granite was used for the pavers, which demand meticulus placement to maintain pattern lines and a level top surface.It’s this compactable characteristic that makes the sub-base strong. Depending on region, you may use 3/4-inch minus crushed granite or even crushed concrete, which also compacts well. It helps to be familiar with what’s used as road base for concrete and asphalt in your area.
Sand & edging
The next level is bedding sand. “The purpose for the bedding course of sand is so you can screed the surface flat,” says Youngblood, who uses about 1 1/2 inches of sand for pavers with uniform thickness and up to 4 inches for jobs employing natural stone. Be sure to order the correct sand, usually a course, angular sand such as 2NS.
The use of a paver edge restraint or a concrete curb is recommended on the perimeter and depends on soil conditions and the likelihood of vehicle tires getting onto the very edge of the driveway.
Paver process
Laying manufactured pavers means carefully placing the starting row according to the pattern and laying subsequent pavers so gridlines are maintained. With natural stone, the process is complicated by the irregular dimensions of the materials.
Finish work
Joint sand, the finishing touch, divides into two categories: traditional joint sand and polymeric sand, which employs bonding agents to solidify and seal the sand. Polymeric is longer lasting and prevents weeds from taking root, but it’s tricky to finish, so make sure you learn the process involved before committing to it.


